I want to add a new sensor type to Android Things using the user-space driver extension mechanism provided by the API. The new sensor type is ‘Distance’ and comes from a Laser Range Finder (LRF) connected via a UART. The goal for this project is to read data from the LRF over a UART, add ‘distance’ from the LRF as a new type of sensor, and display the distance on an LCD.
This task is about adding a new sensor type to Android Things. This is something you can’t do in Android (without modifying AOSP and building your own ROM) so I’m interested to see how the process goes.
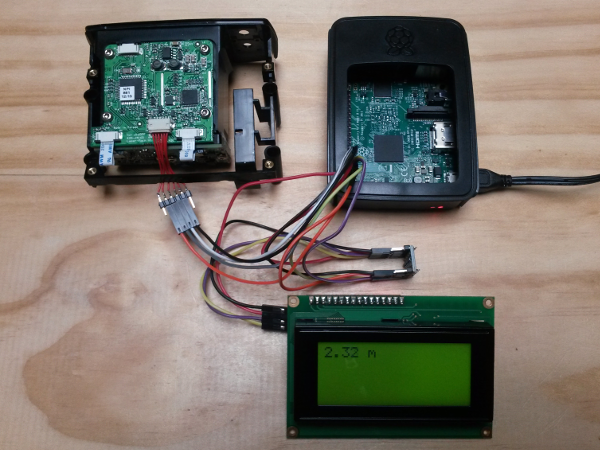
The Setup
The setup is similar to my previous experiments with the addition of a laser range finder.
- Raspberry Pi 3 running Android Things preview image 1,
- LCM1602 (clone),
- character LCD,
- level shifter for I2C,
- laser range finder.
Disclaimer: I have access to this LRF because I work for the company that makes them. This is not something you can buy off the shelf.
Using the UART on the Raspberry Pi
In the Android Things preview image for the Raspberry Pi, the UART is used for kernel console output. To use it to connect to a peripheral you need to disable this output as described in this StackOverflow answer.
Adding a new sensor type to Android Things.
In Android proper you are limited to the sensors already defined in the framework. This means that if you want to add a sensor that’s not defined you have to modify the framework to add you own, create a driver for it, and build your own Android image.
In Android Things there is a new extension mechanism that lets you create sensors without modifying the framework. You can use the user-space driver mechanism to add your own instance of an already existing sensor type, or you can add a completely new sensor type.
Reviewing the defined sensor types you can see there is no distance sensor type. The closest is TYPE_PROXIMITY which can give you a range in centimetres. A laser range finder can give you a distance of many, even hundreds, of meters so I don’t think ‘proximity’ is quite the right type.
The Process
To add a new sensor to Android Things you create a UserSensorDriver to return a UserSensorReading when polled by the system, create the UserSensor defining your sensor’s parameters, and register it and the driver with the UserDriverManager.
Creating a User Driver
To add a new sensor you need to write a driver for it. The details of this will depend on how your sensor is connected to your board. The LRF I am using is connected to the Raspberry Pi via a UART and provides a ‘sort of’ NMEA interface. The LRF periodically sends a distance measurement over the UART to the Raspberry Pi. My driver reads this distance measurement and provides the framework with an updated distance when polled. The key this is to create a UserSensorDriver and implement the read() method. You can also control power to you sensor by implementing power control in the setEnabled() method of UserSensorDriver. For the moment I’m not implementing power control features, but I could have GPIO control power to the LRF here if it was connected to a controllable power supply.
My driver saves the latest distance provided by the LRF and converts it to a UserSensorReading, which takes an array of floats.
  UserSensorDriver userSensorDriver = new UserSensorDriver() {
    @Override
    public UserSensorReading read() throws IOException {

      // Return a new reading
      if (latestDistance == null) {
        throw new IOException("Unable to read sensor");
      }
      return new UserSensorReading(new float[]{latestDistance.getDistance(), (float) latestDistance.getStatus()});
    }

    // Called by the framework to toggle low power modes
    @Override
    public void setEnabled(boolean enabled) {
      if (enabled) {
        // Exit low power mode
      } else {
        // Enter low power mode
      }
    }
  };
Creating a UserSensor with UserSensor.Builder
The Android Things API provides a builder you can use to describe the features of your sensor. This lets you set the type, name, vendor and other parameters. It’s also how you associate your driver implementation with your sensor. In my case, since I am creating a sensor type that doesn’t exist in the framework, I’ll use the customSensorType() method of the builder to tell it about my sensor type. The builder creates the UserSensor that will be registered with the framework later.
    UserSensor laserRangeFinder = UserSensor.builder()
            .setName(LRF_SENSOR_NAME)
            .setVendor(LRF_SENSOR_VENDOR)
            .setCustomType(Sensor.TYPE_DEVICE_PRIVATE_BASE,
                    LRF_SENSOR_TYPE,
                    Sensor.REPORTING_MODE_CONTINUOUS)
            .setDriver(userSensorDriver)
            .setMaxRange(300)
            .build();
LRF_SENSOR_NAME, LFR_SENSOR_TYPE, and LRF_SENSOR_VENDOR are just strings I’ve defined in my driver.
Registering the Sensor with the Framework
Once UserSensorDriver and UserSensor objects are created, register the new sensor with the framework.
    UserDriverManager.getManager()
            .registerSensor(laserRangeFinder);
That’s it for the driver side. Now, from the sensor consumer, I need to access the new sensor.
Accessing the Sensor
To access your sensor you implement the SensorEventListener interface, as you would normally with Android, and register to receive updates from the SensorManager. The only slight complication with Android Things is that your sensor may not exist when you ask the sensor manager about it, especially if your driver and consumer code are in the same process. You can wait for your driver to be registered and available by implementing a SensorManager.DynamicSensorCallback…
  private class SensorCallback extends SensorManager.DynamicSensorCallback {
    @Override
    public void onDynamicSensorConnected(Sensor sensor) {
      Log.i(TAG, sensor.getName() + " has been connected");

      if (SensorDriverService.LRF_SENSOR_NAME.equals(sensor.getName())) {
        sensorManager.registerListener(MainActivity.this, sensor,
                SensorManager.SENSOR_DELAY_NORMAL);
      }
    }

    @Override
    public void onDynamicSensorDisconnected(Sensor sensor) {
      Log.i(TAG, sensor.getName() + " has been disconnected");

      // Stop receiving sensor readings
      sensorManager.unregisterListener(MainActivity.this);
    }
  }
and registering it with the SensorManager…
    sensorManager = (SensorManager) getSystemService(Context.SENSOR_SERVICE);
    sensorManager.registerDynamicSensorCallback(new SensorCallback());
Once that’s done and everything is registered I use the sensor reading in my main activity. In this project I’m displaying it on the LCD using my things-drivers.
  @Override
  public void onSensorChanged(SensorEvent event) {
    Log.d(TAG, "onSensorChanged: " + event.values[0]);
    lcd.clearLine(1);
    lcd.print(1, String.format(Locale.UK, "%3.2f m", event.values[0]));
  }
Go Outside and Play
Once the driver is setup and working the next thing any budding IoT enthusiast should do is bolt it all to a piece of wood and point it at something far away 🙂

How far away is that?

That’s far.
Conclusion
In this experiment I’ve defined a new sensor type in Android Things, created a driver for it using Android Thing’s use space driver mechanism, and pointed lasers at houses in my neighbourhood. The Android Things user space sensor driver mechanism does what it says on the box. Good job Android Things! Now I need to find a shark to bolt this laser to…