In the first part of this series we set up some hardware to drive an LCD character display with the Raspberry Pi running the preview image of Android Things. In this part we will setup the project in Android Studio, import the driver library and write a message to the display.
Create the Project
Start by creating a new project in Android Studio for Android Things. You can follow the tutorial on the Android Developer site. Be sure to add the Android Things support library as a dependency, and declare a home activity as described in the official documentation.
Add the Library
In the dependencies section of your app module’s build.gradle add the line
compile 'nz.geek.android.things:things-drivers:1.1.0'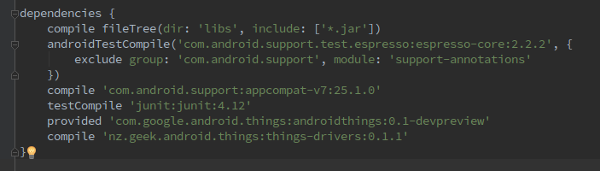
Using the Driver
Create an instance of I2cSerialCharLcd using the classes builder. The builder method takes the LCD display’s width and height. Then use the builder to map the LCM1602’s pins to the LCD display pins. Build the lcd object and call connect on it to initialise the display. Now you can use the display with the print method, this takes the line (row) number to print to and a message to print.
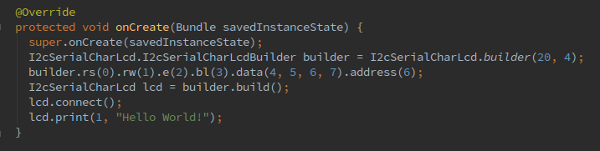
The builder methods take the PCF8574 pin numbers corresponding to P0-P7 from the device datasheet, e.g., for P0 the pin number is 0. You may need to consult your module’s datasheet to get the right pin mapping, though LCDs and LCM1602s (and clones) have a standard pinout as used in my example.
Builder Methods
rs()sets the Register select pinrw()sets the Read/Write pine()sets the Enable pindata()sets D4 to D7 pinsaddress()sets the value of A0-A2 for your LCM1602 (which you set with solder bridges on the board. 7 is the default)bl()tells the driver which PCF8574 pin controls the backlight (if available)
Not shown in this example is isPcf8574() which tells the driver to use the base address of the less common PCF8574 instead of the normal PCF8574A.
Driver Features
With the LCD driver you can clear each display line with clearLine(), passing it the line to clear. You can also enable and disable the lcd backlight with enableBacklight().
You can also define custom characters with setCgRam(). I’ll explain how to use this feature in future.
Example Code
Here’s the full MainActivity for this example
package com.example.android.androidthingsexample;

import android.support.v7.app.AppCompatActivity;
import android.os.Bundle;

import nz.geek.android.things.drivers.lcd.I2cSerialCharLcd;

public class MainActivity extends AppCompatActivity {

  @Override
  protected void onCreate(Bundle savedInstanceState) {
    super.onCreate(savedInstanceState);
    I2cSerialCharLcd.I2cSerialCharLcdBuilder builder = I2cSerialCharLcd.builder(20, 4);
    builder.rs(0).rw(1).e(2).bl(3).data(4, 5, 6, 7).address(6);
    I2cSerialCharLcd lcd = builder.build();
    lcd.connect();
    lcd.print(1, "Hello World!");
  }

}